
Waffle Maker Cinnamon Rolls: The Canned Dough Shortcut By Chef Emma
Yes — the easiest waffle maker cinnamon rolls shortcut is to use refrigerated canned dough: place one roll in the center of a preheated waffle maker, close the lid, and cook for 3 to 4 minutes until golden and cooked through. Total time, including preheating, is under 10 minutes, and you don’t need a rolling pin, yeast, or any rising time.
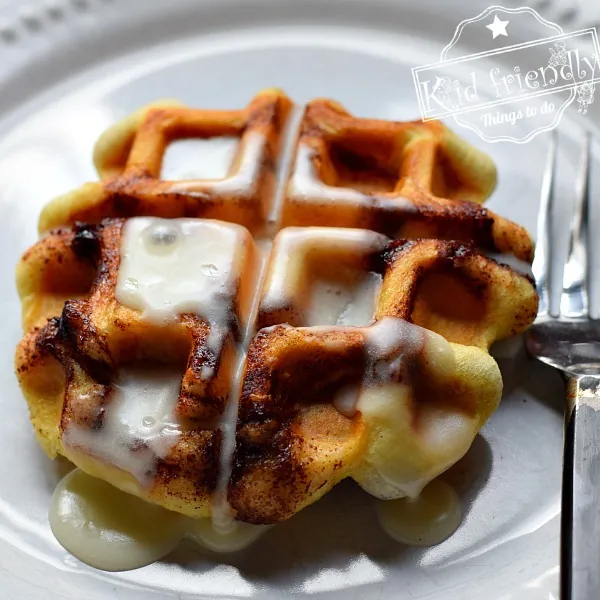
I’m Emma — I cooked professionally for 24 years, and this is the trick I now use on slow Sunday mornings at home. Canned dough works because it’s already leavened and sweetened, so the waffle maker’s direct heat browns the sugar coating while the interior cooks through. The result is a crisp, caramelized outside with a soft, pillowy inside — closer to a churro-waffle hybrid than a baked roll.
Step by step waffle maker cinnamon rolls

This is the whole procedure. It works for standard-size refrigerated cinnamon rolls (the kind sold in tubes of 8), not jumbo or mini sizes.
- Preheat the waffle maker. Set it to medium if you have a dial. High heat burns the sugar coating before the center cooks through.
- Grease lightly. Brush or spray both plates with a thin layer of oil or butter. The cinnamon sugar in the dough makes rolls stick far more than plain waffle batter does.
- Place one roll per square. Put a single roll in the center of each waffle square. One standard roll fills one square; two will fuse together and stay raw in the middle.
- Close the lid gently. Don’t force it. The dough rises as it heats, so the lid will sit slightly open at first — that’s normal.
- Cook 3 to 4 minutes. Peek at the 3-minute mark. You want a deep golden brown, not pale. Raw dough should be cooked through, so if it still looks doughy in the seams, give it another minute.
- Check the center. Lift one out and press the middle with a fingertip — it should spring back, not leave a dent. If in doubt, split one open; the dough should have no wet, raw-looking streaks.
- Ice after cooking. Drizzle the included icing over the hot rolls right away so it melts into the ridges.
Tip: Start with one test roll before loading all the squares. Every waffle maker browns differently, and one roll tells you the exact timing for yours.
Cooking Times by Roll Type
Times vary with the dough, so here’s what to expect per type. Your waffle maker is the real judge — color and springiness beat the clock every time.
| Dough type | Heat setting | Time per batch | What you get |
|---|---|---|---|
| Standard canned rolls (tube of 8) | Medium | 3–4 min | Golden outside, soft middle |
| Jumbo canned rolls | Medium-low | 5–6 min | Thicker center — check it splits clean |
| Mini rolls or cut halves | Medium | 2–3 min | Crisp edges, fastest option |
| Homemade rolled dough | Medium | 4–5 min | Depends on thickness; test one first |
If a roll browns before the middle cooks, your heat is too high — drop the setting one notch and add a minute rather than pushing through faster.
What Goes Wrong and How to Fix It
Why did my cinnamon rolls burn before cooking through?
That’s the sugar, not your timing. Canned rolls are coated in cinnamon sugar, which browns much faster than plain waffle batter. Lower the heat to medium-low, and wipe any melted sugar off the plates between batches with a damp cloth on a cool maker — leftover sugar keeps burning the next batch.
Why are my rolls sticking to the plates?
You need more fat than a normal waffle batch. Brush both plates with melted butter or spray oil every single batch, not just the first. If a roll tears when you lift it, let it cool for 30 seconds — the sugar crust firms up and releases on its own.
Why did my rolls come out doughy in the middle?
Overfilled squares are the usual cause. Two rolls in one square, or jumbo dough on high heat, leaves the center raw while the outside darkens. Cook one roll per square at medium, and if the middle is still doughy at 4 minutes, finish that batch at 5 minutes with the lid closed.
Can You Use This Shortcut With Other Doughs?
Yes, and it’s genuinely useful to know which ones behave. Biscuit dough from a can works well — cook at the same 3 to 4 minutes and you get a savory waffle. Crescent dough flattens into thin, crisp layers and needs only 2 minutes.
Frozen bread dough or anything with yeast is the wrong tool here: it needs rising time the waffle maker can’t give it, so thaw and let it rise fully before cooking. Skip it, or thaw it fully and treat it like my homemade timing above.
Leftover cooked rolls keep in an airtight container in the refrigerator for a few days. They reheat well in a toaster for a minute or two.
Related guides
- What Is the First Thing to Cook in a New Air Fryer? A Beginner’s Guide by Chef Emma
- Why Do Chefs Hate Air Fryers? The Honest Kitchen Truth
- Why Don’t Chefs Like Air Fryers? The Honest Kitchen Answer
Frequently Asked Questions
Can I use Pillsbury cinnamon rolls in a waffle maker?
Yes — the standard tubes of 8 work best. Cook one roll per square on medium for 3 to 4 minutes. Grands and other jumbo rolls also work but need 5 to 6 minutes on medium-low, and you should split one open to confirm the center is done.
Do cinnamon rolls taste like waffles or like rolls?
Neither, exactly — they taste like the outside of a cinnamon roll. The direct heat caramelizes the sugar coating into a crisp, slightly crunchy shell, while the inside stays soft and buttery. It’s closer to a fried dough or churro texture than a baked roll.
Can I make these without the icing packet?
Yes. The rolls are sweet on their own, so the icing is optional. A quick substitute: stir a few tablespoons of powdered sugar with a teaspoon of milk, or skip the topping entirely and serve them with butter like a waffle.
Conclusion
Grab a tube of standard refrigerated rolls and cook a single test roll first — that one roll tells you your waffle maker’s exact timing, and every batch after is effortless. If you’re feeding a crowd, keep finished rolls warm in a 200°F oven while the rest cook.

I’m passionate about helping home cooks make everyday cooking easier, smarter, and more enjoyable. I share practical kitchen tips, cookware guides, cooking tutorials, and simple recipe inspiration based on real kitchen experience and modern home cooking needs.